About: Cockpit kit for Radio Control models.
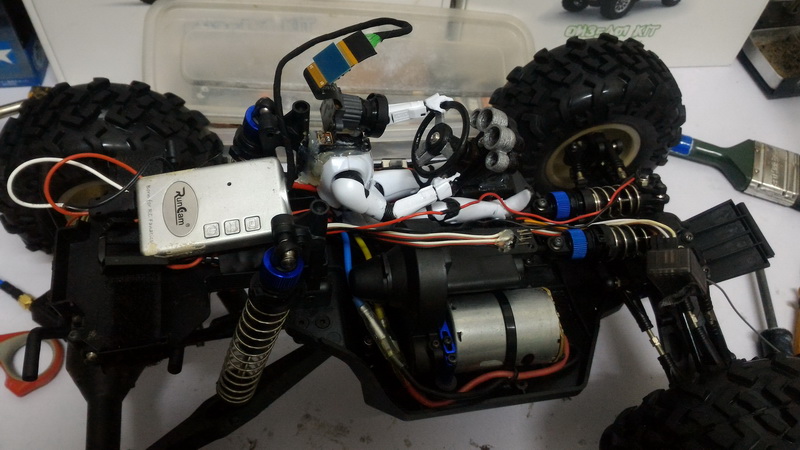
This recent years i have been actively created lots of scale FPV (ground drone) vehicle models which i'm trying to emulate realistic live in- cockpit driving experience from driver seat point of view with FPV camera panning capability for immersive driving inside nice looking scaled miniature of on-road and off-road R/C vehicle. The problem is that most R/C models doesn't come with solid dashboard panels and workable driver's steering wheels so i've decided to step in to come out with a solution to 3D design and 3d print this generic cockpit kit for FPV use that support steering servo and generic mounting on any R/C vehicle models.
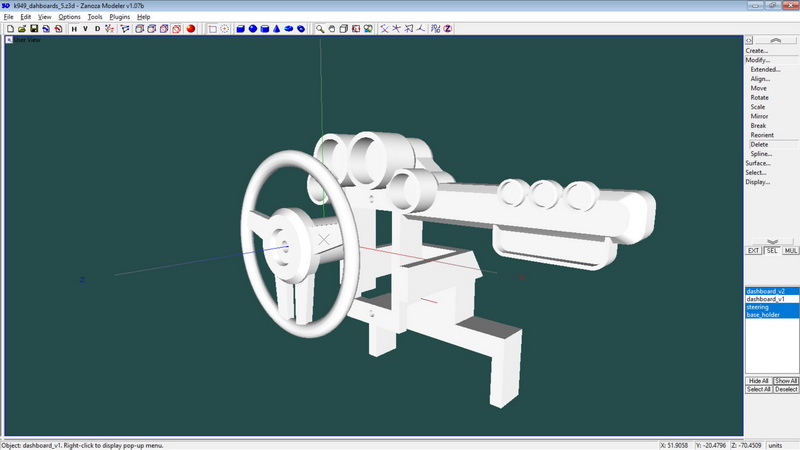
This 3d printed kit i design is for 1:10 scale ground FPV models such as cars, buggy, trucks, on-road and off-road FPV models. It consist of 3x parts; the dashboard (dummy center gauge/meters), driver's steering wheel and base mounting. Originally build for my VATERRA  TWIN HAMMER/WL-TOYS K949/A333/10428# series off-road models because the base mounting kit designed to clip-in the bottom part of this particular model so that the dashboard can stand up right easily, however it can be generically use on other models by ignoring the use of base mounting part and just use the dashboard and steering parts through self improvised DIY works/mods or zip tie it to fasten to the chassis or body shell via railing provided behind the dashboard.
The dashboard parts comes in two variation; (a) simple panel ideal for left and right side driving and (b)long extended dash panel (for left driving side only). Below the dashboard there is a square rectangular void to mount mini 9g size servo (eg: HXT900 servo or compatible size) to drive/rotate the driver's steering wheel part. To mount the driver's steering part you'll need slightly longer screw to attach into the servo shaft.
Kit specification & requirements:
- 3d printed kit compatibility use: 1:10 scale models
- Base 'clip-in' mount part: Compatible for VATERRA TWIN HAMMER/WL-TOYS K949/A333/10428# series (*Ignore this part if to be use on other models)
- Dashboard parts variants: 2x; (A)normal (4 dummy gauge/meters) ideal for left and right side driving and (B) extended wide (7 dummy gauge/meters) only for left side
 driving only.
 - Dashboard adjustable tilt angle: YES (base parts + dashboard = clip and permanent glue mounting style)
- Driver's steering wheel servo mounting size: mini MG90S or HXT900 9g servo (21x12x22 mm / 0.74x0.42x0.78 in)
The kit i build was printed using ABS filament for more tough and rigid use inside my FPV models especially for off-roading and could withstand hot weather since my models roam a lot in the open but you can use other material such as PLA and Nylon at your discretion. *Note that highly recommended to use high torque metal gear type servo for steering part because if you need to put in driver figurine with arms and hands extended then attached on to the steering the force and friction might add extra load to the servo torque load operation which might strip normal plastic geared servo.
Complete assembly parts (Variant A):

Blow-out parts (Variant A):

Complete assembly parts (Variant B):

Blow-out parts (Variant B):

Videos:
How to:
There are two ways to install this kit:
-
If you're to install on VATERRA TWIN HAMMER/WL-TOYS K949/A333/10428# series you'll need all 3x parts together. Base mount need to clip-in to the model's big steering servo (1-9/16 x 13/16 x 1-7/16 in)(40 x 20 x 36
 mm) and glue solid via hot glue. The top of the base mount then needed to clip-in the lower base of the dash part, you'll need to adjust your desired tilt angle of your dashboard before you can glue or hot glue the attachment. However before you do this make sure to install the mini 9g servo into its servo steering place holder before attaching the dashboard to the base mount via clipping. Then finally the driver's steering part is inserted into the servo shaft and make sure to use longer screw to reach the servo shaft for secure installation.
 -
If you're trying to install on other 'non-compatible' models above then you can only use only 2x parts kit which are the dashboard and steering parts only. You can improvise your own DIY mounting else the dashboard can be mounted via zip ties behind the dashboard railing. Then remaining installation such as steering setup follow the same procedure as above.
After the installation you can do your of final decoration or touch up such as creating your of DIY gauge/meter sticker and acrylic paint jobs to make the 3d printed kit looks realistic and making the FPV driving looks more aesthetic around the cockpit.
![]() Gallery |
Gallery | ![]() Download STL file for 3D printing
Download STL file for 3D printing

Your shopping list to buy parts to build the above kit:
You'll need mini servo for this kit:
- Seller Banggood.com: MG90S Metal Gear RC Micro Servo For RC Model
* Else any servo can be use as long they are within dimension (21x12x22 mm / 0.74x0.42x0.78 in) or any standard generic MG90S or HXT900 style servo.

