How to add texture to a 3d object surface? Got problem mapping a texture? Read the mapping tutorial below.
Tools to be used in tutorial:
- 3D modeling software: Zanoza 3D ver 1.05. >> http://www.zmodeler.com
updated : 2/11/2002
What is mapping [UV mapping].
Mapping is a task of applying an empty plain 3d object with textured images. Its like wrapping your plain uncolored box with colorful wrapping paper. It's also like applying nice wallpaper to your empty PC desktop screen.
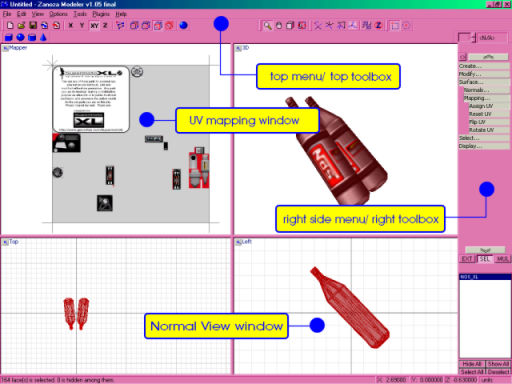
| Below are image of Z-modeler application with tips and guide to aid you through the texture mapping tutorial. |
|
|
Let's start mapping. - Ok get your Z-modeler and read the steps below:
- Open your Z-modeler and import/open a 3d object that you need to map.
- Open a "UV Mapper" window by clicking an icon on the top left corner on any "Normal view windows". [see the image below]
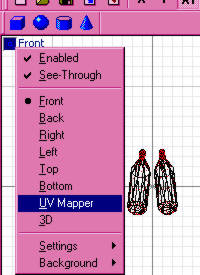
- A "Mapper" windows will be displayed with empty work space/ empty background/ null texture. This is because you haven't select an object to be mapped.
- Go to the "Normal view windows" and select/highlight the object you want to apply texture. Default highlighted object should be red in color.
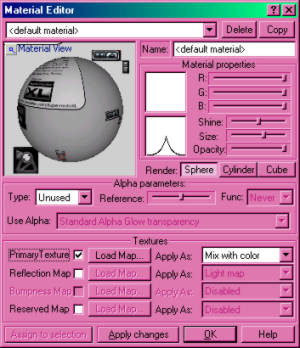
- Then go to the top menu and select [View] >> [Material Editor...]. A "Material Editor" pop-up window will appear on the screen. Select the appropriate texture and click "Apply" and "OK" to assign texture to selected/highlighted object. [as shown in the image below].
- (This steps is for fresh 3d object that have never been assigned to a texture, Else skip this and go to step 7). Go to the right side menu/right toolbox and click the appropriate selection: [Surface...] >> [Mapping...] >> [Reset UV]. Your cursor will turn into small box will little dot in the middle. Again, select/highlight your object and go to the right side menu/right tool box and click the appropriate selection: [Surface...] >> [Mapping...] >> [Assign UV]. Move the cursor to the selected/highlighted object and click it until a texture appear in the "UV mapping window/ Mapper"
- ( This step is for 3d object that have been previously assined with texture). Go to the right side menu/right toolbox and click the appropriate selection: [Surface...] >> [Mapping...] >> [Assign UV]. Your cursor will turn into small box will little dot in the middle. Move the cursor to the selected/highlighted object and click it until a texture appear in the "UV mapping window/ Mapper"
- Go to the "UV mapping window/ Mapper", a wire frame of your 3d object should appear and mapped onto the texture. [as shown in the image below].
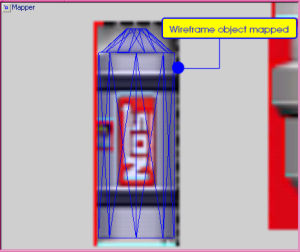
- If you cannot see the wireframe object in the "UV mapping windows/Mapper" try zoom out by clicking the [Zoom] icon (a magnifying glass icon) located on the top menu/ top toolbox. Go to the "UV mapping windows/ Mapper" and right click to zoom out the texture or left click to zoom in.
- If the wireframe object does not mapped onto appropriate texture area you can move the wireframe object. First, select/ highlight the wireframe object in your "UV mapping windows/ Mapper".
- Then click the right side menu/ right toolbox, click [Modify...] >> [Move] to move the vertices or faces of a wireframe object in the "UV mapping windows/ Mapper"
- Move the selected/highlighted wireframe object to the appropriate texture area.
- Result of your newly applied textured 3d object can be viewed in "3d view window" of an object by clicking on icon located on the top left corner of every object window.
- To see the actual result of a textured 3d object you must enable all the setting in the "3D view", To access the menu, click the "3d view" icon located on the top left corner in your object viewing windows. Click it and the menu will pop-up. [as shown in the image below].
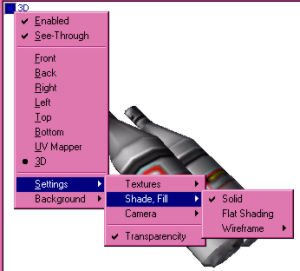
- Click [Settings] >> [Textures] >> and check/ turn on the appropriate texture option.
- Again click [Settings] >> [Shade, Fill] >> [Solid (checked/on)]. Make sure the "Solid" option checked/turn on to enable the texture visible on the 3d object's surface.
- If you have any further question or problem on Texture Mapping you can go to the "Main Tutorial Page" for more help and FAQ.
GOOD LUCK!

