About
Any radio control model hobby is an expensive hobbies regardless of size, genre nor demographic of hobbyist. Any model will have its part worn out or damaged especially if you're an avid basher; cars, trucks, crawlers or circuit racers. One of most resource consuming parts both money and time is the 'body shell'. Its the biggest part on ground R/C model which are times after expensive purchase you'll need cut, trim, paint, customized and fitting only in the future you'll wreck it again during few bashes. For R/C grade bodies it will cost at minimal USD$30 to USD$90 on average; if you're lucky you'll get some pre-painted with accessories usually on braded ones or just some noromal blank transparent Lexan to do the work all over again minus painting cost which again will bite huge chunks of your wallet. Today i'm going to teach you how to save money and use other alternative ways to get an attractive body shell for your truck with more PRO's then CON's which some R/C industries won't bother to tell you about it. All you need to do is a simple trip to your local cheap toy store or your young cousins places, lol.

If you go to any normal kids toy shop you'll more likely or 100% stumble upon some plastic kids grade toys cars and trucks on the shelf that was build for 'hand push' or rowing on the floor type for kids under 5 years to throw around the cement wall or even can be used for pets chew toys. They usually made from 'kids safe plastic' to meet some safety standard which means these plastic bodies are extremely durable, not easy to shattered into debris and extremely elastic. Some are of these toys are nicely molded in detailed aesthetic while other are very blunt looks however the overall the price for these toys is in average cost between USD$2 to $5 dollars in complete package. As shown in the attached picture i have few R/C grade models that uses kiddy grade toys ripped out the car body from its base chassis and planted on my R/C model and they do looks good for a quick 5 minutes fitting work. For example here's my Yellow colored USD$3 Ferrari body shell i bought from toy store for my 1/18 NANDA NRX-18 chassis (X-RAY M18) which looks far more detailed plastic model and looks realistic when compare side by side with my $40 original lexan body plus a white spray paint cans which looks too blunt and blank to stare at. The only disadvantages of toy plastic bodies is they are a bit heavy due to their beefy plastic wall which can be intimidating if you're doing it for racing at competition event, however for average everyday drive its works great!

|
Pros:
|
Cons:
|

Step by step installation/fitting
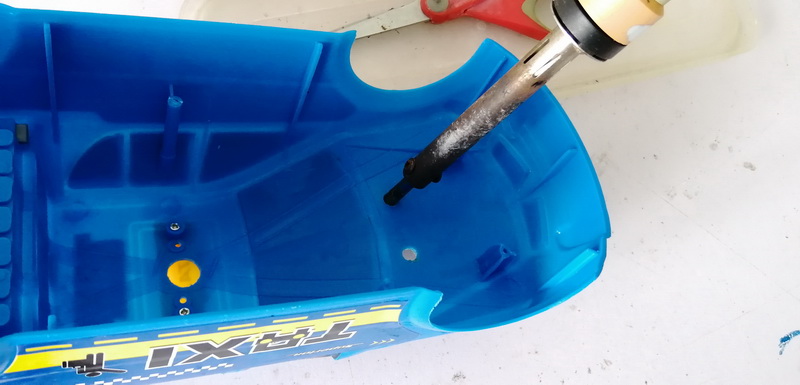
Ok let's cut the story short and i'll show how to fit this toy grade USD$2 body shell which i'm going to do it on my 1/16 CEN RACING -MINI MADNESS monster truck which i've already trashed hard its original shoddy Lexan body shell. Note that this new blue colored 'TAXI' labelled toy grade bodyshell i got it from local toy store as a complete kiddy toy car sized perfectly on my 1/16 model. Quite sturdy and strong elastic plastic which i think could almost last forever. It came with funny unsensible decals and also body accessories, lol! Well lets begin some DIY installation shall we:
STEP 1:
Remove the body shell from the toy chassis. From inside remove all those long plastic screw pillar to save some weight and allow more room to fit into the chassis.

STEP 2:
Ream or drill some holes to allow the chassis 'pin' mounted body poles to go through the body shell. If you don't have any drill tools you can use soldering iron to melt the whole through.

STEP 3:
Mount the body on to the chassis....you're done!!! See its easy!!! You can just do it in 5 minutes rather than whole day cutting, spray paint and trimming an over priced body shell.


List of visual references and related articles:
- Galleries: 1/18 Nanda NRX-18, X-Ray M18, HaiBoxing HBX-18, HuanQi M18, LRP SHARK 18
- Galleries: 1/16 CEN Mini Madness

Summary
There you go guys, a USD$2 dollars hobby solution!!! No shame of being cheap, lmao! Be smart, be resourceful and save more budget for other hobby projects. Hope this tutorial helps to get your R/C hobby growing in more resourceful and alternative ways! Enjoy!

