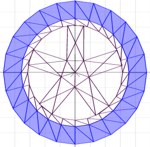
Right here i am going to teach you how to build a low polycount flanged/spoked wheels. Make sure you have Z-modeler version 1.07 and above.
Tools to be used in tutorial:
- 3D modeling software: Zanoza 3D ver 1.07 >> http://www.zmodeler.com
updated : 14/2/2004
How to built wheel.
Want to built your own custom wheels, yes you can. Now i'm going to teach you how to built basic wheel models. A very simple techniques which includes building, attaching spokes and etc. So get ready with your tools.
- Start your Z-modeler application.
- In your Z-modeler there are four view port, select any of them and set your view to 'LEFT' view.
- By default you can see grid boxes/lines and plane axis (X,Y) lines on the background. Look around for AXIS center point. (Make sure the center AXIS point is located in the center, else you'll need to reset the axis via main tool box 'DISPLAY..'>>'RESET AXIS'). From there you will start building an object that form a wheel.
- Now lets get down to business. Click the 'CYLINDER' buttons and create a cylinder with 5 horizontal step value and 0 vertical step if you intend to create wheels with 5 spokes. Start building it and place it in the center axis. The center axis is your wheel hub. A menu will pop up that required you to name the object, lets name it 'HUB.' Done?

A. Create a basic 'HUB'. This object will be place in the center and as guidance to place location for 5 spokes. - Create a box using 'CUBE' object button, name it as 'SPOKES_1' and stretch to make it rectangular, then move it to the edge of the hub like as shown in the picture.
- OK, now since you are building a wheel with five spoke: Rotate the triangular box 'SPOKES_1' that you've just made. To 0 degree up.


7. The center with 5 side is your 'HUB', while the rectagular is your 'SPOKE_1'. Location of spoke in the picture is 0 degree top. 8. Duplicate the SPOKE and rotate each and every duplicated copy of spoke around the stationary 'HUB'. Each flat sides of the hub will represent the place where the spokes should be positioned. (Make sure the center AXIS point is located in the center, else you'll need to reset the axis via main tool box 'DISPLAY..'>>'RESET AXIS'). After you've done with all 5 spokes, highlight all the object. Click 'CREATE..' >> 'OBJECTS..' >> 'UNITESELECT' from the main tool box on your right windows to unite all object as one. Name the new united object as 'FLANGE'. 

9. In User View: With 'VERTICES' button selected highlight the 'FLANGE' object and right click. You can see the pointy intersection of vertices nodes between the spokes and the hub. Unite them using the 'CREATE' >> 'OBJECT' >> 'UNITESELECT' from main tool bar on your right windows. 10. When you are done uniting the nearby vertices it should look like as shown above. Repeat the same task for other vertices. 

11. When every vertices combined/united between nearby spokes and hubs it should looked like the picture shown above. 12. Back to the LEFT view port: Create an object via 'TUBE' object tools with value of 24 horizon steps and 0 vertical steps. Start create it from the center and outwards. Name your new object as 'RIM'. Upon completion it should looked like as shown above. 13. Again, Create an object via 'TUBE' object tools with value of 24 horizon steps and 2 vertical steps. Start create it from the center and outwards. Name your new object as 'TIRE'. This time make sure the inner perimeter of your tube lay on top of the ''RIM''s outer ring. Upon completion it should looked like as shown above. The highlighted ones is your 'TIRE'. 
14. Using your the 'D' button in the Z-modeler (Depth axis modify), The 'VERTICES' button and different view port (LEFT/TOP/RIGHT/USER VIEW), adjust the location and position of each newly created object (FLANGE, RIM and TIRE). Adjust, move and resize it according to your specification. When you're done it should look like the picture as shown on your right. 15. Done? Congratulation!! you've just successfully when through the "Beginners guide to 'DIY (Do IT Yourself)'wheels" Good Luck.

** For ultimate wheel building and texturing go get yourself a tutorial that comes in CD-ROM on sale.
GOOD LUCK!
